

Angular CanDeactivate Guard Tutorial
read Mar 29, 2021 3477 reads No comments
Getting Started
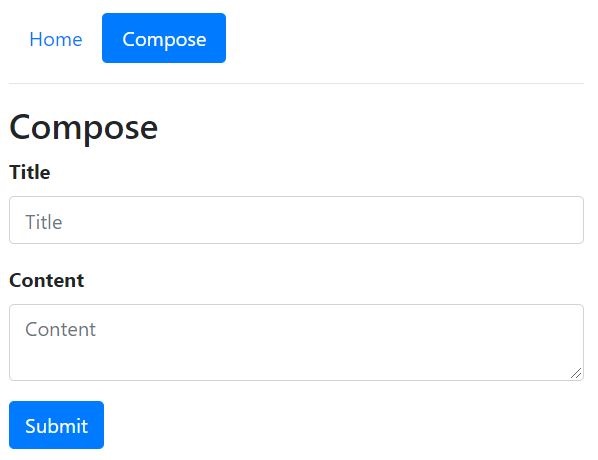
We're going to build a simple app with two routes, home and compose. The compose component has a reactive form with two controls, and when you try to navigate away, the app is going to show a confirmation dialog if the form is dirty. If the form is submitted successfully, we simulate an HTTP call and redirect to the home component. The end result is going to look like this:
Let's start by creating a new Angular project. Make sure you have Node.js, NPM, and Angular CLI installed. I'm using these versions:
- node v12.19.0
- npm v6.14.8
- Angular CLI v11.2.5
Open a terminal (PowerShell, Command-prompt, etc.) and run this command:
ng new ng-can-deactivate-guard-example --style=scss --routing=trueThis will create a new project named ng-can-deactivate-guard-example with SCSS for styling and routing. I'm going to use Bootstrap for UI components:
npm install --save bootstrapNext, import Bootstrap in src/styles.scss:
@import "~bootstrap/scss/bootstrap";Alternatively, you could import just the CSS in angular.json:
"styles": [
  "node_modules/bootstrap/dist/css/bootstrap.min.css",
  "src/styles.scss"
]
Lastly, update index.html and wrap the root element in a container:
<!doctype html>
<html lang="en">
<head>
  <base href="/">
  <meta charset="utf-8">
  <title>CanDeactivate Guard Example</title>
  <meta name="viewport" content="width=device-width, initial-scale=1">
  <link rel="icon" type="image/x-icon" href="favicon.ico">
</head>
<body>
  <div class="container">
    <main role="main">
      <app-root>loading...</app-root>
    </main>
  </div>
</body>
</html>
Routes and Components
Before we define the routes, we need the components in place. Our app is going to have two simple routes. Create a folder named pages under the app directory. Let's start with the home component.
The Home Component
Create the component files manually or generate them using the Angular CLI:
ng generate component pages/homeThe home component is just for routing, it doesn't have a UI or business logic. Open home.component.html and replace the template:
<div class="row">
  <div class="col">
    <h3>Home</h3>
  </div>
</div>
Replace the home.component.ts file with the following too:
import { Component } from "@angular/core";

@Component({
  selector: "app-home",
  templateUrl: "./home.component.html"
})
export class HomeComponent {}
The Compose Component
Next, create the compose component:
ng generate component pages/composeThis component has a simple form with two controls: title, and content. Open compose.component.html and add the template markup:
<div class="row">
  <div class="col">
    <h3>Compose</h3>

    <form [formGroup]="composeForm" (ngSubmit)="onSubmit()" novalidate>
      <!-- title -->
      <div class="form-group">
        <label for="title" class="control-label font-weight-bold">Title</label>
        <input type="text" class="form-control" formControlName="title" placeholder="Title"
        [ngClass]="{ 'is-valid': submitted && !f.title.errors, 'is-invalid': submitted && f.title.errors }">
        <div class="invalid-feedback" *ngIf="f.title.errors">
          <span *ngIf="f.title.errors.required">Title is required</span>
        </div>
      </div>

      <!-- content -->
      <div class="form-group">
        <label for="content" class="control-label font-weight-bold">Content</label>
        <textarea class="form-control" formControlName="content" placeholder="Content" [ngClass]="{ 'is-valid': submitted && !f.content.errors, 'is-invalid': submitted && f.content.errors }"></textarea>
        <div class="invalid-feedback" *ngIf="f.content.errors">
          <span *ngIf="f.content.errors.required">Content is required</span>
        </div>
      </div>

      <button type="submit" class="btn btn-primary" [disabled]="isWorking">{{ isWorking ? 'Working...' : 'Submit' }}</button>
    </form>
  </div>
</div>
Basic stuff, we have a reactive form with two controls and we're using Bootstrap for styling and validation feedback. The submit button gets disabled when the app is working and displays a different text. Now open compose.component.ts and add the component code:
import { Component } from "@angular/core";
import { FormControl, FormGroup, Validators } from "@angular/forms";
import { Router } from "@angular/router";

@Component({
  selector: "app-compose",
  templateUrl: "./compose.component.html"
})
export class ComposeComponent {
  constructor(private router: Router) {}

  submitted = false;
  isWorking = false;

  composeForm = new FormGroup({
    title: new FormControl(null, [Validators.required]),
    content: new FormControl(null, [Validators.required])
  });

  // helper method for easy access to form controls
  get f() {
    return this.composeForm.controls;
  }

  onSubmit() {
    this.submitted = true;

    if (this.composeForm.invalid) {
      return;
    }

    this.isWorking = true;
    this.composeForm.disable();

    setTimeout(() => {
      this.composeForm.reset();
      this.composeForm.enable();
      this.submitted = false;
      this.isWorking = false;
      this.router.navigate(["/"]);
    }, 1000);
  }
}
We have a submit method that checks whether the form is valid or not. If valid, we simulate an HTTP call (calling your API, etc.) using setTimeout. While the app is working, we disable the form. After it's done, we reset and reenable the form and navigate to the root route.
The App Component
The app component has no logic, just a navbar, and a router outlet. Replace app.component.ts with the following:
import { Component } from '@angular/core';

@Component({
  selector: 'app-root',
  templateUrl: './app.component.html',
  styleUrls: [ './app.component.scss' ]
})
export class AppComponent  { }
And app.component.html with this template:
<div class="row mt-3">
  <div class="col">
    <ul class="nav nav-pills">
      <li class="nav-item">
        <a class="nav-link" [routerLink]="['/']" routerLinkActive="active" [routerLinkActiveOptions]="{ exact: true }">Home</a>
      </li>
      <li class="nav-item">
        <a class="nav-link" [routerLink]="['/compose']" routerLinkActive="active" [routerLinkActiveOptions]="{ exact: true }">Compose</a>
      </li>
    </ul>
    <hr>
    <router-outlet></router-outlet>
  </div>
</div>
Navigation Routes
When you create a new project with routing enabled using the Angular CLI, a app-routing.module.ts file is generated for you. To keep things simple, let's remove that and define the routes directly in app.module.ts:
import { NgModule } from '@angular/core';
import { BrowserModule } from '@angular/platform-browser';
import { ReactiveFormsModule } from '@angular/forms';
import { RouterModule, Routes } from '@angular/router';

import { AppComponent } from './app.component';
import { HomeComponent } from './pages/home/home.component';
import { ComposeComponent } from './pages/compose/compose.component';

const routes: Routes = [
  { path: '', pathMatch: 'full', component: HomeComponent },
  { path: 'home', component: HomeComponent },
  {
    path: 'compose',
    component: ComposeComponent,
  },
];

@NgModule({
  imports: [
    BrowserModule,
    ReactiveFormsModule,
    RouterModule.forRoot(routes, { useHash: true }),
  ],
  declarations: [
    AppComponent,
    HomeComponent,
    ComposeComponent
  ],
  bootstrap: [AppComponent],
})
export class AppModule {}
We're importing the ReactiveFormsModule and RouterModule, and we're defining our routes using the routes collection. Nothing special, we have two routes and a default route that renders the home component. If you run npm start and run the project, you should see something like the following and be able to navigate between the two routes:
Brilliant, so far so good. Now we need a route guard to prevent users from accidentally leaving the compose component if there are unsaved changes (if the form is dirty).
The CanDeactivate Guard
To implement route guards, you need to create classes that implement the appropriate interface defined by Angular. In our case, we need a class implementing the CanDeactivate<T> interface. But we want a flexible implementation so that we can reuse the route guard in different components. First, create a folder named guards under the app directory. Now create a new class named can-deactivate.guard.ts and add the following code:
import { Injectable } from '@angular/core';
import { CanDeactivate } from '@angular/router';
import { Observable } from 'rxjs';

export interface CanComponentDeactivate {
  canDeactivate: () => Observable<boolean> | Promise<boolean> | boolean;
}

@Injectable()
export class CanDeactivateGuard
  implements CanDeactivate<CanComponentDeactivate> {
  canDeactivate(component: CanComponentDeactivate) {
    return component.canDeactivate ? component.canDeactivate() : true;
  }
}
We are exporting an interface named CanComponentDeactivate and creating a class named CanDeactivateGuard, which implements this interface. The CanDeactivate interface from Angular expects you to return a boolean, we're just extending that with our own interface. For more information have a look at the official docs. Now we can implement this interface in whatever component we need. The consuming components need to define a canDeactivate method and return a boolean value. Note that the return value can be an observable, a promise, or just a simple boolean.
To use this route guard, we need to update our route definitions first. Open app.module.ts and change the compose route:
const routes: Routes = [
  // removed for brevity
  {
    path: 'compose',
    component: ComposeComponent,
    canDeactivate: [CanDeactivateGuard],
  },
];
We've added the canDeactivate array, registering the CanDeactivateGuard class we just created. Route guards can be chained together, so you could have multiple guards on a single route. We also need to add the CanDeactivateGuard class to the app module's providers:
@NgModule({
  imports: [ ... ],
  declarations: [ ... ],
  providers: [CanDeactivateGuard],
  bootstrap: [AppComponent],
})
export class AppModule {}
This ensures that the route guard is available across the app. Now open compose.component.ts and make the following changes. First, the compose component needs to implement the CanComponentDeactivate interface:
import { Component, HostListener } from "@angular/core";
import { CanComponentDeactivate } from "../../guards/can-deactivate.guard";

@Component({
  selector: "app-compose",
  templateUrl: "./compose.component.html"
})
export class ComposeComponent implements CanComponentDeactivate { }
Notice that we've imported HostListener too. The interface requires us to implement the canDeactivate method:
  @HostListener("window:beforeunload")
  canDeactivate() {
    if (this.composeForm.dirty) {
      return confirm('You have unsaved changes. Discard and leave?');
    }

    return true;
  }
We are binding to window:beforeunload which happens when you close the browser or the active tab. You could bind to other host events too. This method is really simple, all we're doing is check whether the form is dirty or not. If so, we give users a chance to stay on the component instead of accidentally navigating away. Otherwise, we return true which means navigation can continue.
Now if you run the app again and try to navigate away with a dirty form, you'll get a native browser dialog like this:
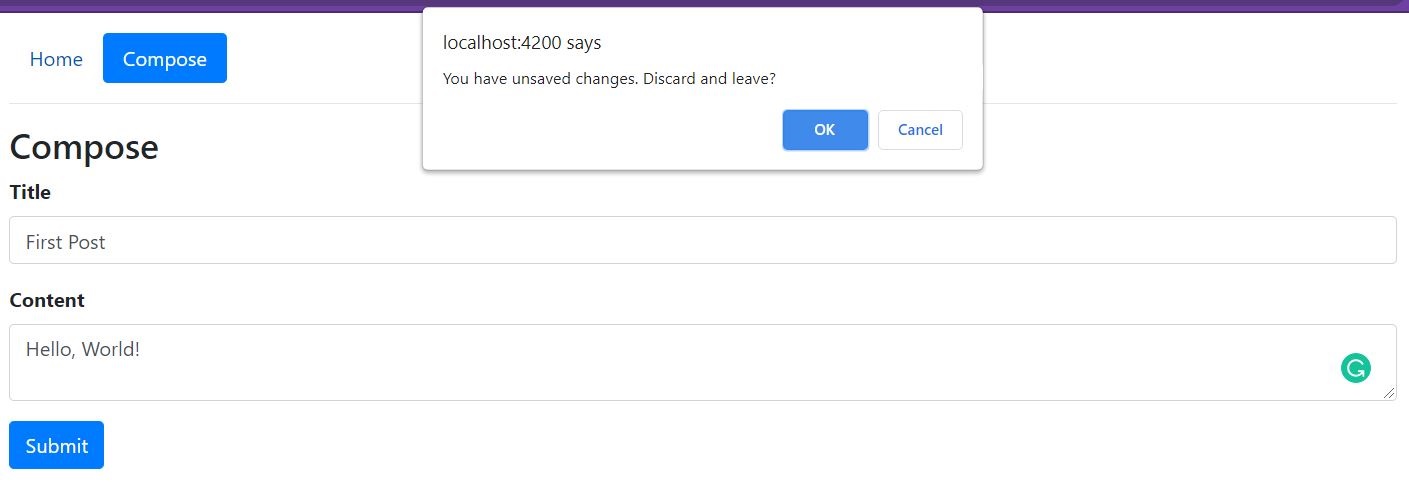
That's it, we have a CanDeactivate guard working like a charm. But wait, there's more. What if we wanted to show a custom component instead of using the native browser dialog?
Custom Dialog with ng-bootstrap
You may need to show custom components so that you could display HTML templates, show data, offer different choices, etc. I'm going to use ng-bootstrap for native Bootstrap components, but you could do the same with the UI framework of your choice (NG-ZORRO, Material, etc.). Install the library using Angular schematics:
ng add @ng-bootstrap/ng-bootstrapCheck out the docs if you want to install the library manually. Next, we're going to build a simple modal component. Create a folder named components under the app directory. Create another folder named deactivate-confirm and create the component files, just the TypeScript class, and a template. Open deactivate-confirm.component.html and replace it with the following:
<div class="modal-header border-bottom-0">
  <h4 class="modal-title text-success pb-0">Confirm</h4>
</div>
<div class="modal-body">
  <p class="mb-0">You have unsaved changes. Are you sure you want to leave?</p>
</div>
<div class="modal-footer border-top-0">
  <button type="button" class="btn btn-outline-primary px-3" (click)="leave()">Leave</button>
  <button type="button" class="btn btn-primary px-4" (click)="stay()" ngbAutoFocus>Stay</button>
</div>
Nothing to see here, just a modal template with two buttons. Open deactivate-confirm.component.ts and replace it with the following:
import { Component } from "@angular/core";
import { NgbActiveModal } from "@ng-bootstrap/ng-bootstrap";

@Component({
  selector: "app-deactivate-confirm",
  templateUrl: "./deactivate-confirm.component.html"
})
export class DeactivateConfirmComponent {
  constructor(public modal: NgbActiveModal) {}

  leave() {
    this.modal.close(true);
  }

  stay() {
    this.modal.close(false);
  }
}
Here we have two methods that close the modal with a boolean value. Based on this result, we'll know whether we should stay on a component or leave. Finally, we need to update the compose component and change the canDeactivate method, make sure to inject the NgbModal service too:
export class ComposeComponent implements CanComponentDeactivate {
  constructor(private router: Router, private modalService: NgbModal) {}

  @HostListener("window:beforeunload")
  canDeactivate() {
    if (this.composeForm.dirty) {
      const modalRef = this.modalService.open(DeactivateConfirmComponent, {
        backdrop: "static",
        centered: true
      });

      return modalRef.result;
    }

    return true;
  }
}
Same implementation, but instead of showing a native browser dialog we're opening a modal using our custom component. The backdrop: static property is important, this means that the modal can't be closed by clicking outside of it, which is exactly what we want. NgbModal instances return a Promise, so we can just open the modal and return its result. Run the app again and you should see something like this:

Fabulous! I've put up a live demo on StackBlitz for you to play with.
Source Code
You can find a working demo on StackBlitz, or get the source code on Github. Happy coding.
Updated at Mar 30, 2021
