

Sort & Filter Data Tables in Angular
read Apr 9, 2021 21839 reads No comments
There are many free and commercial libraries out there with full-fledged data tables and advanced features. If you have a good reason for using a 3rd party solution or spending a ton of time developing your own components, that's fine, but oftentimes you only need basic features like sorting, filtering, and pagination, all of which can be achieved with JavaScript and the flexibility that Angular provides.
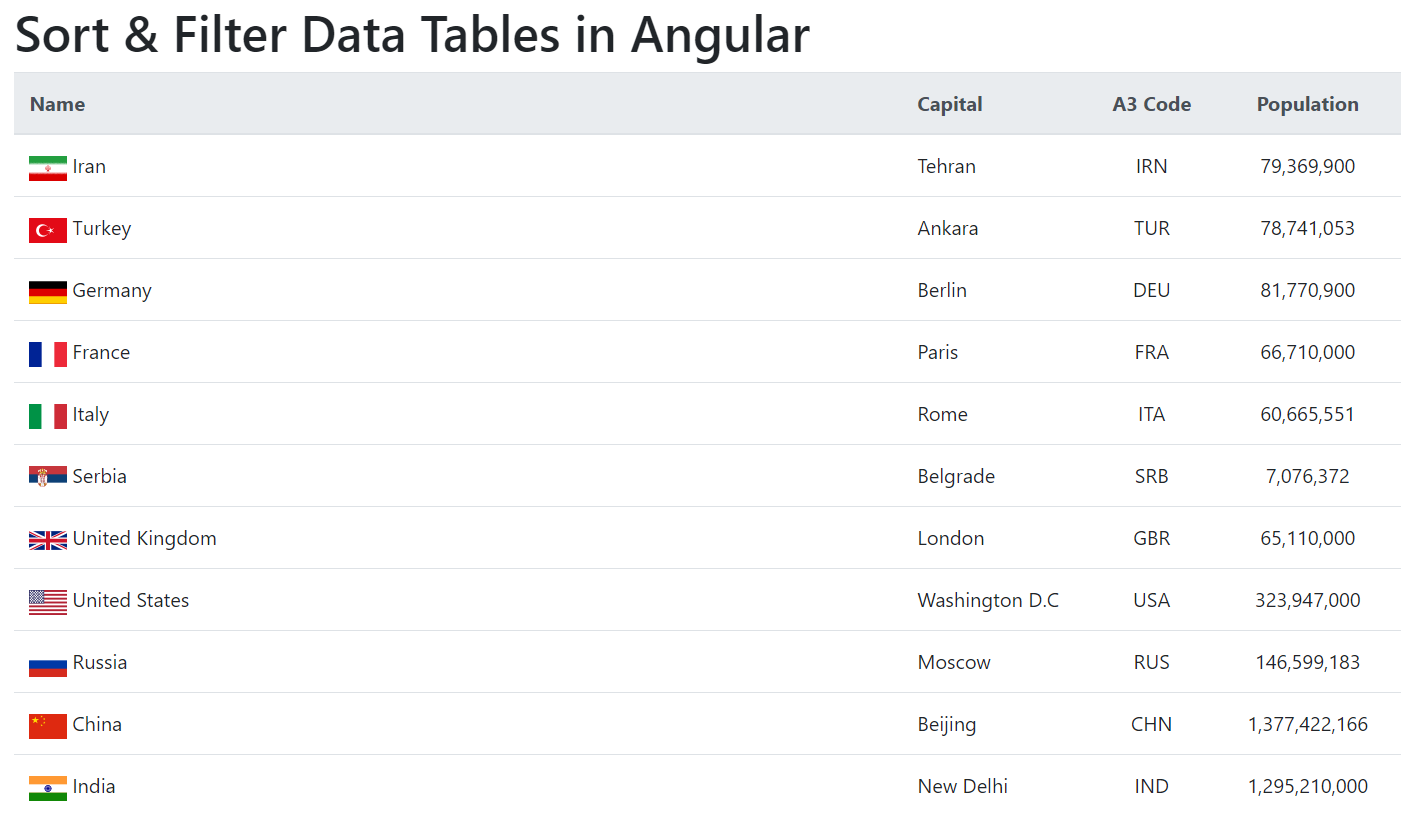
We're going to build a simple app that displays a list of countries and enables you to filter the results by name or capital city. Additionally, we're going to create an attribute directive for sorting table headers in ascending and descending order. The end result is going to look like this:
Getting Started
Let's start by creating a new Angular project. Make sure you have Node.js, NPM, and Angular CLI installed. I'm using the following versions:
- node v12.19.0
- npm v6.14.8
- ng v11.2.6
Open a terminal (PowerShell, Command-Prompt) and run:
ng new ng-table-sort-and-filter --style=scss --routing=falseThis will create a new project named ng-table-sort-and-filter with SCSS styling and no routing. I'm going to use Bootstrap for UI components, install that too:
npm install --save bootstrapNext, open src/styles.scss and import Bootstrap:
@import "~bootstrap/scss/bootstrap";Alternatively, instead of importing the SCSS file, you could import the CSS in angular.json:
"styles": [
  "node_modules/bootstrap/dist/css/bootstrap.min.css",
  "src/styles.scss"
]
Open the index.html file and replace it with the following:
<!doctype html>
<html lang="en">
  <head>
    <meta charset="utf-8">
    <meta name="viewport" content="width=device-width, initial-scale=1, shrink-to-fit=no">
    <title>Sort & Filter Data Tables in Angular</title>
  </head>
  <body>
    <div class="container">
      <main role="main">
        <app-root>loading...</app-root>
      </main>
    </div>
  </body>
</html>
A basic Bootstrap layout, wrapping the <app-root> component in a container. Finally, open the app.module.ts file and import the FormsModule:
import { NgModule } from '@angular/core';
import { BrowserModule } from '@angular/platform-browser';
import { FormsModule } from '@angular/forms';

import { AppComponent } from './app.component';

@NgModule({
  declarations: [AppComponent],
  imports: [BrowserModule, FormsModule],
  providers: [],
  bootstrap: [AppComponent],
})
export class AppModule {}
Great, we've set up our project. Continuing with the data table.
The Dataset
To keep things simple, we're going to define a JSON data collection to use in our table. I've taken the data from REST Countries, a free (and fun) API for getting information about countries, make sure to check it out. In a real-world application, the data would come from your database, an API call, etc. Create a file named data.ts under the src/app directory and paste the following code:
export interface Country {
  name: string;
  capital: string;
  alpha3Code: string;
  population: number;
  flag: string;
}

export const dataset: Array<Country> = [
  {
    name: 'Iran',
    capital: 'Tehran',
    alpha3Code: 'IRN',
    population: 79369900,
    flag: 'https://restcountries.eu/data/irn.svg',
  },
  {
    name: 'Turkey',
    capital: 'Ankara',
    alpha3Code: 'TUR',
    population: 78741053,
    flag: 'https://restcountries.eu/data/tur.svg',
  },
  {
    name: 'Germany',
    capital: 'Berlin',
    alpha3Code: 'DEU',
    population: 81770900,
    flag: 'https://restcountries.eu/data/deu.svg',
  },
  {
    name: 'France',
    capital: 'Paris',
    alpha3Code: 'FRA',
    population: 66710000,
    flag: 'https://restcountries.eu/data/fra.svg',
  },
  {
    name: 'Italy',
    capital: 'Rome',
    alpha3Code: 'ITA',
    population: 60665551,
    flag: 'https://restcountries.eu/data/ita.svg',
  },
  {
    name: 'Serbia',
    capital: 'Belgrade',
    alpha3Code: 'SRB',
    population: 7076372,
    flag: 'https://restcountries.eu/data/srb.svg',
  },
  {
    name: 'United Kingdom',
    capital: 'London',
    alpha3Code: 'GBR',
    population: 65110000,
    flag: 'https://restcountries.eu/data/gbr.svg',
  },
  {
    name: 'United States',
    capital: 'Washington D.C',
    alpha3Code: 'USA',
    population: 323947000,
    flag: 'https://restcountries.eu/data/usa.svg',
  },
  {
    name: 'Russia',
    capital: 'Moscow',
    alpha3Code: 'RUS',
    population: 146599183,
    flag: 'https://restcountries.eu/data/rus.svg',
  },
  {
    name: 'China',
    capital: 'Beijing',
    alpha3Code: 'CHN',
    population: 1377422166,
    flag: 'https://restcountries.eu/data/chn.svg',
  },
  {
    name: 'India',
    capital: 'New Delhi',
    alpha3Code: 'IND',
    population: 1295210000,
    flag: 'https://restcountries.eu/data/ind.svg',
  },
];
We're exporting an interface named Country to strongly type the data:
export interface Country {
  name: string;
  capital: string;
  alpha3Code: string;
  population: number;
  flag: string;
}
Then we're exporting a constant named dataset with a hard-coded collection of countries. Now we can display this data in a table.
Displaying the data in a table
First, open app.component.ts and import the data:
import { Component } from '@angular/core';
import { Country, dataset } from './data';

@Component({
  selector: 'app-root',
  templateUrl: './app.component.html',
  styleUrls: ['./app.component.scss'],
})
export class AppComponent {
  countries: Array<Country> = dataset;
}
We've imported the Country interface and the dataset collection from data.ts, and we've defined a property named countries set to the data collection.
Next, Open app.component.html and replace it with the following template:
<div class="row mt-3">
  <div class="col">
    <h1>Sort & Filter Data Tables in Angular</h1>

    <div class="table-responsive">
      <table class="table table-hover">
        <thead class="thead-light">
          <tr>
            <th>Name</th>
            <th width="150">Capital</th>
            <th class="text-center" width="100">A3 Code</th>
            <th class="text-center" width="150">Population</th>
          </tr>
        </thead>
        <tbody>
          <tr *ngFor="let country of countries">
            <td>
              <img [src]="country.flag" alt="flag" width="30" height="20">
              {{ country.name }}
            </td>
            <td>{{ country.capital }}</td>
            <td class="text-center">{{ country.alpha3Code }}</td>
            <td class="text-center">{{ country.population | number }}</td>
          </tr>
        </tbody>
      </table>
    </div>
  </div>
</div>
Nothing special here, we have a table element styled with Bootstrap classes. Using the ngFor directive, we iterate through the collection and render a row for each country. If you run the app using npm start you should see something like this:
Cool, so we have our data table. Now let's see how we can filter the list with an input.
Filtering results
We want to display an input element where you enter the country name or the capital city and filter the table as you type. We're going to need a Pipe directive for that. If you're not familiar with pipes in Angular, make sure to have a read on the official docs. Basically, pipes are TypeScript classes used to transform data. You give them some input, transform it however you want, and return a result.
Create a file named country.pipe.ts under the src/app directory and paste the following code:
import { Pipe, PipeTransform } from '@angular/core';
import { Country } from './data';

@Pipe({ name: 'country' })
export class CountryPipe implements PipeTransform {
  transform(values: Country[], filter: string): Country[] {
    if (!filter || filter.length === 0) {
      return values;
    }

    if (values.length === 0) {
      return values;
    }

    return values.filter((value: Country) => {
      const nameFound =
        value.name.toLowerCase().indexOf(filter.toLowerCase()) !== -1;
      const capitalFound =
        value.capital.toLowerCase().indexOf(filter.toLowerCase()) !== -1;

      if (nameFound || capitalFound) {
        return value;
      }
    });
  }
}
Pipes are simple classes that implement the PipeTransform interface. We've named our pipe country, that's the keyword we're going to use in our template. We've also imported the Country interface to get intellisense support and strong typing. The PipeTransform interface has a single method you need to implement, the transform method. The values argument is the data we want to transform, passed in from our template, and the filter argument is the search term coming from the input field. You notice that the transform method returns an array of Country objects.
You can pass multiple arguments to pipes, or none at all. If you need a pipe to transform the data without an input argument, you just define the values argument in the transform method.
The first thing we do is check whether we have a filter value or not. If the filter argument is undefined or empty, we return the original values, nothing happens. Next, we check whether the values collection is empty or not. If so, we return the original values, again, nothing happens.
Lastly, if we do have a filter and a collection of values, we filter the results using the JavaScript filter function. We want to find matching results by the country name, or the capital city. So we define two variables for each. We transform the values to lowercase and check whether the country name or capital city includes the search term. If either is found, we return the object.
Before we can use this pipe, we need to import it in the app module, so open app.module.ts and add it to the declarations array:
// other imports
import { CountryPipe } from './country.pipe';

@NgModule({
  declarations: [AppComponent, CountryPipe],
  // ...
})
export class AppModule {}
Next, open app.component.ts and define the filter property:
import { Component } from '@angular/core';
import { Country, dataset } from './data';

@Component({
  selector: 'app-root',
  templateUrl: './app.component.html',
  styleUrls: ['./app.component.scss'],
})
export class AppComponent {
  filter: string;
  countries: Array<Country> = dataset;
}
And lastly, open app.component.html and add the input field, and apply the pipe to the table:
<div class="row mt-3">
<div class="col">
<h1>Sort & Filter Data Tables in Angular</h1>
<div class="form-group">
<input type="search" class="form-control" [(ngModel)]="filter" placeholder="Filter by name or capital">
</div>
<div class="table-responsive">
<table class="table table-hover">
<thead class="thead-light">
<tr>
<th>Name</th>
<th width="150">Capital</th>
<th class="text-center" width="100">A3 Code</th>
<th class="text-center" width="150">Population</th>
</tr>
</thead>
<tbody>
<tr *ngFor="let country of countries | country:filter">
<td>
<img [src]="country.flag" alt="flag" width="30" height="20">
{{ country.name }}
</td>
<td>{{ country.capital }}</td>
<td class="text-center">{{ country.alpha3Code }}</td>
<td class="text-center">{{ country.population | number }}</td>
</tr>
</tbody>
</table>
</div>
</div>
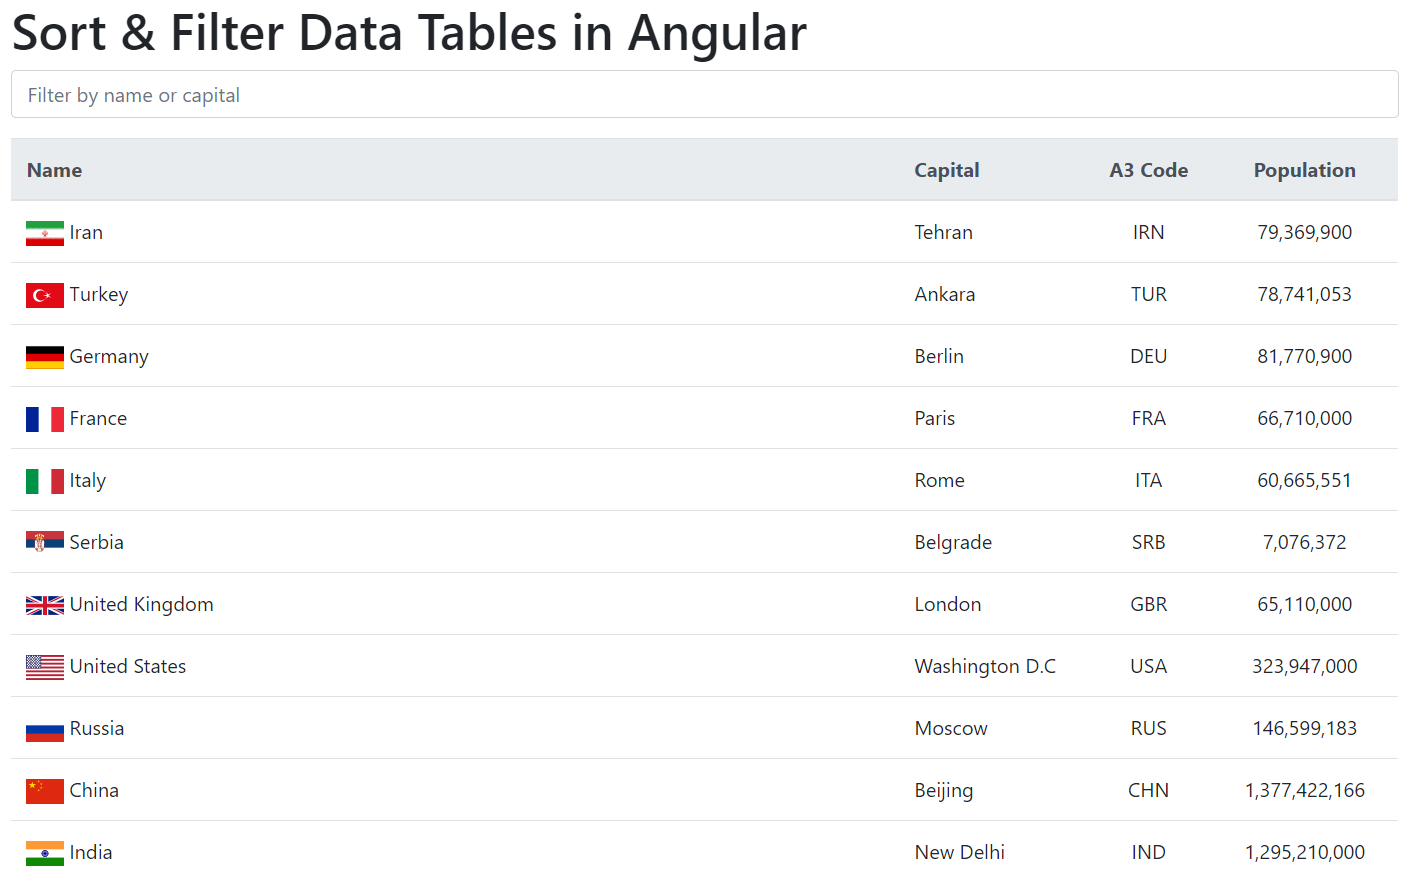
</div>The input field is bound to the filter property using two-way data binding. In the <tbody> section of our table where we render countries using ngFor, we're applying our pipe on the data source, the countries property. So the countries collection is passed to our pipe as the values argument, and the filter argument is whatever we have in the input field. Run the app again and you should see this:
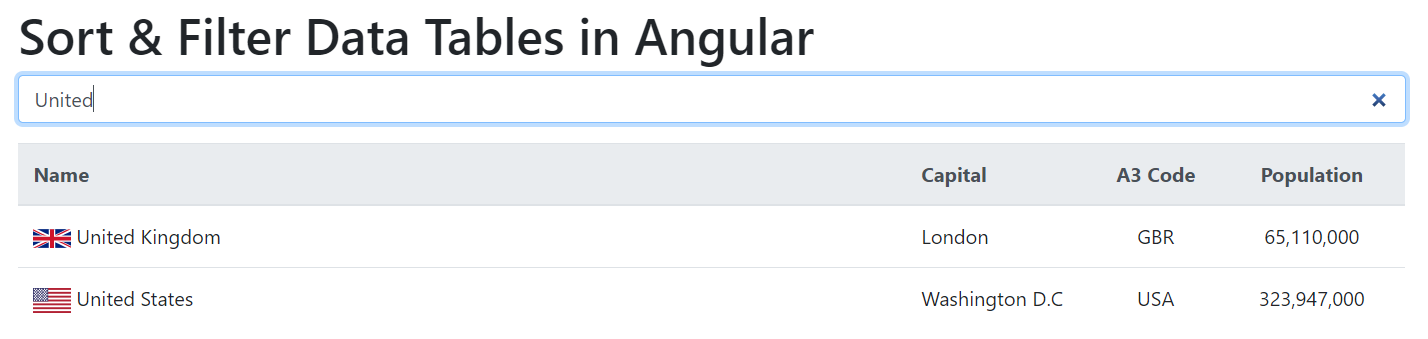
Type in a country name or a capital city and you should see the filtered results:
Brilliant, now we can filter the table. The pipe logic could be anything you need, depends on your data structure and what you want to return as the result. For instance, you could break the filter string into words, and search for multiple keywords. I leave that to you to have fun with this example. Moving on with the sorting functionality.
Sorting by headers
When users click a table header, what we want to do is, sort the data based on the clicked property. You could wire up the headers to click handlers, and sort the table using simple properties and functions. But that's no good, we need a reusable mechanism. We'll create an attribute directive for that. Create a file named sortable-header.directive.ts under the src/app directory. Here's the complete code:
import { Directive, EventEmitter, Input, Output } from '@angular/core';
import { Country } from './data';

export type SortColumn = keyof Country | '';
export type SortDirection = 'asc' | 'desc' | '';

const rotate: { [key: string]: SortDirection } = {
  asc: 'desc',
  desc: '',
  '': 'asc',
};

export const compare = (
  v1: string | number | boolean | Date,
  v2: string | number | boolean | Date
) => (v1 < v2 ? -1 : v1 > v2 ? 1 : 0);

export interface SortEvent {
  column: SortColumn;
  direction: SortDirection;
}

@Directive({
  selector: 'th[sortable]',
  host: {
    '[class.asc]': 'direction === "asc"',
    '[class.desc]': 'direction === "desc"',
    '(click)': 'rotate()',
  },
})
export class SortableHeaderDirective {
  @Input() sortable: SortColumn = '';
  @Input() direction: SortDirection = '';
  @Output() sort = new EventEmitter<SortEvent>();

  rotate() {
    this.direction = rotate[this.direction];
    this.sort.emit({ column: this.sortable, direction: this.direction });
  }
}
Let's go through the code and see what we're doing here. The directive selector is th[sortable], which means you attach the directive to table headers like this:
<table class="table table-hover">
  <thead class="thead-light">
    <tr>
      <th sortable="name">Name</th>
      <!-- other headers -->
    </tr>
  </thead>
  <tbody>
    <!-- table body goes here -->
  </tbody>
</table>
The snippet above means when we click on the header, we want to sort by the name property. You also notice the host property on the directive:
@Directive({
  selector: 'th[sortable]',
  host: {
    '[class.asc]': 'direction === "asc"',
    '[class.desc]': 'direction === "desc"',
    '(click)': 'rotate()',
  },
})
export class SortableHeaderDirective {}
Using the host property, we can change the host element that the directive is attached to. We're adding CSS classes to the host element, based on the direction property. When the direction is asc, we set the asc class, and when the direction is desc, we set the desc class. We've also wired up a click handler. When the host element (table header) is clicked, we call the rorate function.
Now let's see how this directive actually sorts the data. At the top, we're exporting two types: SortColumn and SortDirection. The SortColumn can be any key in the Country interface or an empty string. And the SortDirection can be an empty string, asc, or desc. Simple enough.
The directive defines two inputs and an output property:
export class SortableHeaderDirective {
  @Input() sortable: SortColumn = '';
  @Input() direction: SortDirection = '';
  @Output() sort = new EventEmitter<SortEvent>();
  // ...
}
The sortable input is the property name we pass in from the template. So like the snippet you saw above, if we want to sort the header by the name property, we write sortable="name". The direction input defines how we want to sort the data when a particular header is clicked.
The sort output property is an EventEmitter of type SortEvent, the interface is defined this way:
export interface SortEvent {
  column: SortColumn;
  direction: SortDirection;
}
Whenever a header is clicked, we emit an event with the column that was clicked and the direction value as its parameters. Remember that when the host element is clicked, we call the rotate function:
rotate() {
  this.direction = rotate[this.direction];
  this.sort.emit({ column: this.sortable, direction: this.direction });
}
Inside the rotate function, we update the direction value and emit the sort event. The parent component receives the sort event, and we actually sort the data there. This is good because we're not encapsulating the sorting logic inside the directive, we're just defining a reusable UI behavior. Updating the direction is easy, we have a constant named rotate which is of type SortDirection and accepts a string key as the argument:
const rotate: { [key: string]: SortDirection } = {
  asc: 'desc',
  desc: '',
  '': 'asc',
};
Based on the key value, we rotate the direction for the next click. So far so good. Lastly, we have the compare function which is exported and used by the parent component for sorting data:
export const compare = (
  v1: string | number | boolean | Date,
  v2: string | number | boolean | Date
) => (v1 < v2 ? -1 : v1 > v2 ? 1 : 0);
Nothing fancy going on, just standard JavaScript. The compare function accepts two values as arguments. The values can be strings, numbers, or dates. Recall that the SortColumn type is a key of our Country interface. Based on what you're trying to sort, you'd define the acceptable data types in the compare function.
Now that we have a reusable directive for sorting, we need to update our data table and implement an event handler for the sort event.
Before we can use this directive we need to import it into the app module. Open app.module.ts and replace it with the following:
import { NgModule } from '@angular/core';
import { BrowserModule } from '@angular/platform-browser';
import { FormsModule } from '@angular/forms';

import { AppComponent } from './app.component';
import { CountryPipe } from './country.pipe';
import { SortableHeaderDirective } from './sortable-header.directive';

@NgModule({
  declarations: [AppComponent, CountryPipe, SortableHeaderDirective],
  imports: [BrowserModule, FormsModule],
  providers: [],
  bootstrap: [AppComponent],
})
export class AppModule {}
Open app.component.html and replace the <thead> element with the following:
<thead class="thead-light">
  <tr>
    <th scope="col" sortable="name" (sort)="onSort($event)">Name</th>
    <th scope="col" sortable="capital" (sort)="onSort($event)" width="150">Capital</th>
    <th scope="col" sortable="alpha3Code" (sort)="onSort($event)" class="text-center" width="100">A3 Code</th>
    <th scope="col" sortable="population" (sort)="onSort($event)" class="text-center" width="150">Population</th>
  </tr>
</thead>
We've attached the sortable directive to each header, passing in the property name we want to sort by. Each header defines an event handler for the sort event too.
Now we need to implement the sorting behavior. Open app.component.ts and update the imports:
import { Component, QueryList, ViewChildren } from '@angular/core';
import {
  SortableHeaderDirective,
  SortEvent,
  compare,
} from './sortable-header.directive';
We've imported QueryList and ViewChildren from Angular, and some exported members from our directive. Next, we need a copy of the data to bind our table to. We can't bind to the same data source, because when you sort and filter the results, there's no way of going back to the original dataset. So before the countries property, define the data property set to the countries collection:
data: Array<Country> = dataset;
countries: Array<Country> = dataset;
Next, we need to find all occurrences of our directive in the template, so define the headers property:
@ViewChildren(SortableHeaderDirective)
headers: QueryList<SortableHeaderDirective>;
We're using the @ViewChildren directive to find all instances of our directive. The QueryList<T> finds all instances of the provided type in your template, very handy. Great, so the headers property would give us a collection of SortableHeader directives which we have defined on the <thead> element.
The Sort Function
Whenever a header is clicked we receive a SortEvent with the column and direction values as the payload. Add the onSort function to the app component:
onSort({ column, direction }: SortEvent) {
  // resetting other headers
  this.headers.forEach((header) => {
    if (header.sortable !== column) {
      header.direction = '';
    }
  });

  // sorting countries
  if (direction === '' || column === '') {
    this.countries = this.data;
  } else {
    this.countries = [...this.data].sort((a, b) => {
      const res = compare(a[column], b[column]);
      return direction === 'asc' ? res : -res;
    });
  }
}
The first thing we want to do is reset the other headers. So we iterate through the headers collection and reset the direction.
If the direction value or the column name is empty, we reset the data to the original dataset. So the table displays the data in its original format.
Otherwise, we use the JavaScript sort function to sort the data. Inside the sort function, we use the compare function defined in our directive to compare the values by the clicked property.
Styling the headers
Remember those CSS classes we set on the host element? We need to define the CSS rules. Open src/styles.scss and add the following:
/* sortable header directive */
th[sortable] {
  cursor: pointer;
  user-select: none;
  -webkit-user-select: none;
}

th[sortable].desc:before,
th[sortable].asc:before {
  content: "";
  display: block;
  background: url("data:image/png;base64,iVBORw0KGgoAAAANSUhEUgAAAEAAAABACAYAAACqaXHeAAAAAXNSR0IArs4c6QAAAmxJREFUeAHtmksrRVEUx72fH8CIGQNJkpGUUmakDEiZSJRIZsRQmCkTJRmZmJgQE0kpX0D5DJKJgff7v+ru2u3O3vvc67TOvsdatdrnnP1Y///v7HvvubdbUiIhBISAEBACQkAICAEhIAQ4CXSh2DnyDfmCPEG2Iv9F9MPlM/LHyAecdyMzHYNwR3fdNK/OH9HXl1UCozD24TCvILxizEDWIEzA0FcM8woCgRrJCoS5PIwrANQSMAJX1LEI9bqpQo4JYNFFKRSvIgsxHDVnqZgIkPnNBM0rIGtYk9YOOsqgbgepRCfdbmFtqhFkVEDVPjJp0+Z6e6hRHhqBKgg6ZDCvYBygVmUoEGoh5JTRvIJwhJo1aUOoh4CLPMyvxxi7EWOMgnCGsXXI1GIXlZUYX7ucU+kbR8NW8lh3O7cue0Pk32MKndfUxQFAwxdirk3fHappAnc0oqDPzDfGTBrCfHP04dM4oTV8cxr0SVzH9FF07xD3ib6xCDE+M+aUcVygtWzzbtGX2rPBrEUYfecfQkaFzYi6HjVnGBdtL7epqAlc1+jRdAap74RrnPc4BCijttY2tRcdN0g17w7HqZrXhdJTYAuS3hd8z+vKgK3V1zWPae0mZDMykadBn1hTQBLnZNwVrJpSe/NwEeDsEwCctEOsJTsgxLvCqUl2ACftEGvJDgjxrnBqkh3ASTvEWrIDQrwrnJpkB3DSDrGW7IAQ7wqnJtkBnLRztejXXVu4+mxz/nQ9jR1w5VB86ejLTFcnnDwhzV+F6T+CHZlx6THSjn76eyyBIOPHyDakhBAQAkJACAgBISAEhIAQYCLwC8JxpAmsEGt6AAAAAElFTkSuQmCC")
    no-repeat;
  background-size: 16px;
  width: 16px;
  height: 16px;
  float: left;
  margin-left: -10px;
  margin-top: 4px;
}

th[sortable].desc:before {
  transform: rotate(180deg);
  -ms-transform: rotate(180deg);
}
We want our headers to have a pointer cursor indicating that they're clickable. Both asc and desc classes use a Base64 string as the icon, a simple arrow. The desc class rotates the element 180 degrees for an inverted arrow. If you don't want to style the headers using CSS and instead want to use font libraries like FontAwesome or Bootstrap Icons, you can define a template for the directive and based on the direction value, render an icon. Easy to do, I'll leave that to you to have fun with it.
That's it, we have a simple sort and filtering implementation. Most UI libraries like Bootstrap or NG-ZORRO provide you with UI components for pagination and tables. For most applications, you can use simple UI components and simple JavaScript to implement sort and filtering, pagination, and whatnot. You could easily develop a table component supporting all kinds of advanced features.
Source Code
I've put up a live demo on StackBlitz for you to play with. You can find the project on StackBlitz or get the complete code on Github. Happy coding 🐉.
Updated at Apr 9, 2021
