
Export data to Excel with ASP.NET Core
A while ago I had to export some data to Excel from an ASP.NET Core website. I have implemented a lot of exporting in the past with ASP.NET and C# in general, it was fun to explore different options and port them to ASP.NET Core. In this post, I'll show you how you can generate Excel files using the ClosedXML library.
When needing to export data to Excel, you have a couple of different options. If you need simple tabular data, generating a CSV file may be sufficient. If you need to embed colors, hyperlinks, and formulas, you will need something more advanced. Let's start simple with CSV files.
For the examples in this post, I'll be using ASP.NET Core on .NET 5, with some hard-coded data. In a real-world application, this data would come from user input, or a database, etc. To keep things simple, I'll walk you through some code snippets, you can find the complete code on Github.
The Data Model
Say we have a User model with the following properties:
public class User
{
  public int Id { get; set; }

  public string Username { get; set; }

  public string Email { get; set; }

  public string SerialNumber { get; set; }

  public DateTime JoinedOn { get; set; }
}
And let's say we have a HomeController where we'll hard-code a collection of users to work with:
public class HomeController : Controller
{
private readonly List<User> users = new()
{
new User
{
Id = 1,
Username = "ArminZia",
Email = "armin.zia@gmail.com",
SerialNumber = "NX33-AZ47",
JoinedOn = new DateTime(1988, 04, 20)
},
new User
{
Id = 2,
Username = "DoloresAbernathy",
Email = "dolores.abernathy@gmail.com",
SerialNumber = "CH1D-4AK7",
JoinedOn = new DateTime(2021, 03, 24)
},
new User
{
Id = 3,
Username = "MaeveMillay",
Email = "maeve.millay@live.com",
SerialNumber = "A33B-0JM2",
JoinedOn = new DateTime(2021, 03, 23)
},
new User
{
Id = 4,
Username = "BernardLowe",
Email = "bernard.lowe@hotmail.com",
SerialNumber = "H98M-LIP5",
JoinedOn = new DateTime(2021, 03, 10)
},
new User
{
Id = 5,
Username = "ManInBlack",
Email = "maininblack@gmail.com",
SerialNumber = "XN01-UT6C",
JoinedOn = new DateTime(2021, 03, 9)
}
};
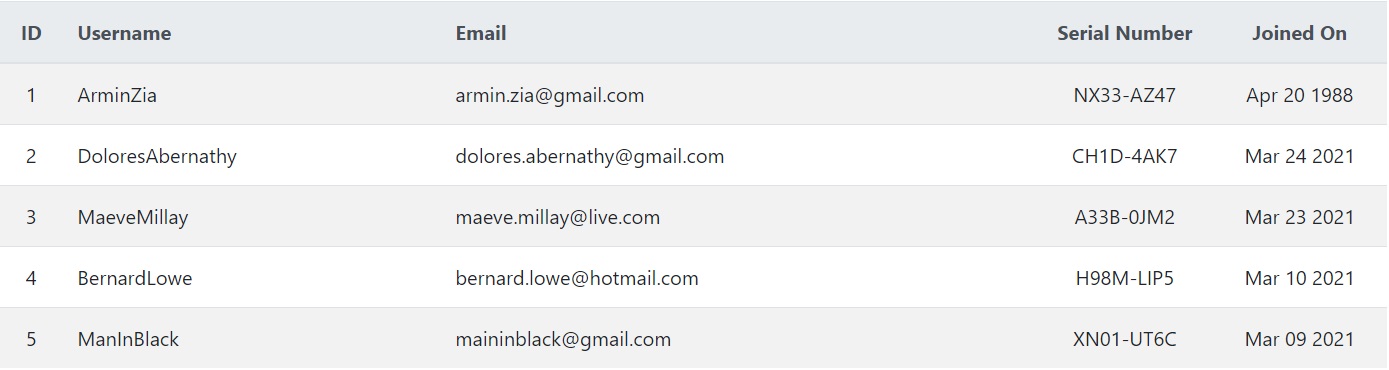
}The users' collection looks like this:
Export to CSV
The simplest way to export data is to generate a comma-separated values (CSV) file. There are NuGet packages to help you with that - like CsvHelper - but in this post, I'll create the CSV file manually. Consider the following action method:
public IActionResult Csv()
{
  var builder = new StringBuilder();

  builder.AppendLine("Id,Username,Email,JoinedOn,SerialNumber");

  foreach (var user in users)
  {
      builder.AppendLine($"{user.Id},{user.Username},{user.Email},{user.JoinedOn.ToShortDateString()},{user.SerialNumber}");
  }

  return File(Encoding.UTF8.GetBytes(builder.ToString()), "text/csv", "users.csv");
}
First, we create a StringBuilder, available in the System.Text namespace. In CSV files, the first line defines the headers. Then we iterate through the users' collection, and for each user, we write a line. Finally, we return a File result with the resulting string as the file content, text/csv as the MIME type, and users.csv as the filename. This action method is a GET method, so the browser will automatically download the content as a CSV file named users.csv.
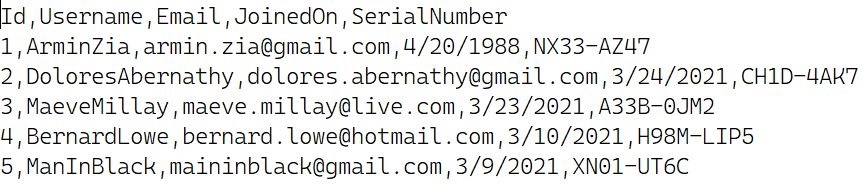
The CSV file (opened in Notepad) looks like this:
Export to Excel (XLSX)
CSV files are great because they're text files, easy to work with, and they work everywhere. But if you need more features like embedding colors and hyperlinks, creating sheets, etc. you'd need another file format. Since XLSX files are XML-based, you can generate the content yourself. That's not recommended though, XLSX is a huge specification and there are many NuGet packages to help you. I'll use ClosedXML because I like the API and its ease of use, but there are other packages like EPPlus and DocumentFormat.OpenXml too.
First, you need to install the NuGet package:
Install-Package ClosedXMLNext, we'll create an action method to generate an XLSX file. ClosedXML provides a rich set of features, make sure to check out the documentation to learn more. The following code formats the output like in the CSV example. Later in this post, I'll show you how you can format the output with more options.
public IActionResult Excel()
{
  using var workbook = new XLWorkbook();
  var worksheet = workbook.Worksheets.Add("Users");
  var currentRow = 1;

  worksheet.Cell(currentRow, 1).Value = "Id";
  worksheet.Cell(currentRow, 2).Value = "Username";
  worksheet.Cell(currentRow, 3).Value = "Email";
  worksheet.Cell(currentRow, 4).Value = "Serial Number";
  worksheet.Cell(currentRow, 5).Value = "Joined On";

  foreach (var user in users)
  {
    currentRow++;

    worksheet.Cell(currentRow, 1).Value = user.Id;
    worksheet.Cell(currentRow, 2).Value = user.Username;
    worksheet.Cell(currentRow, 3).Value = user.Email;
    worksheet.Cell(currentRow, 4).Value = user.SerialNumber;
    worksheet.Cell(currentRow, 5).Value = user.JoinedOn.ToShortDateString();
  }

  using var stream = new MemoryStream();
  workbook.SaveAs(stream);
  var content = stream.ToArray();

  return File(content, "application/vnd.openxmlformats-officedocument.spreadsheetml.sheet", "users.xlsx");
}
Let's examine the code and see what we're doing here. To create an Excel document, we first create an XLWorkbook instance. On line 4, we create a worksheet named Users. The code is pretty simple and straightforward, first, we create the header row. Similar to the CSV example, we output the columns in the header row. Then we iterate through the users' collection and for each user, we create a new row. You access rows and columns using the worksheet instance. Finally, we save the workbook to a MemoryStream, and return the content as a File result. The MIME type is application/vnd.openxmlformats-officedocument.spreadsheetml.sheet and the filename is users.xlsx.
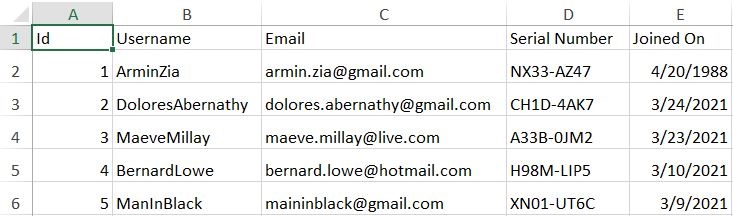
MemoryStream would do just fine. But if you're expecting a large number of concurrent users and large documents, it's better to save the generated document on disk and return a Json result with a URL to the file. Another important thing to consider is that if you're returning the file content as a blob if the connection is lost for whatever reason (internet disconnects, the connection is interrupted, etc.) users will lose their downloads. But if you save the generated file on disk and return a URL, users will be able to download the file without a problem, pause/resume downloads, etc.The XLSX document (opened in Microsoft Office Excel) looks like this:
Formatting the XLSX document
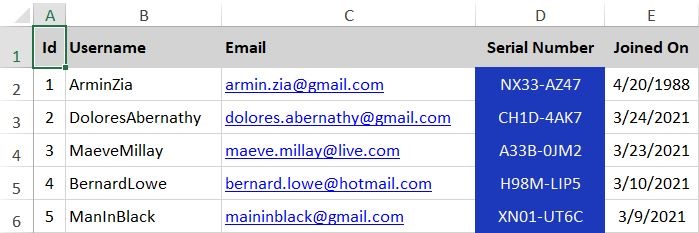
You'll notice that the Excel document is not formatted, we're just writing the values to the file. ClosedXML is a .NET library with an intuitive and user-friendly interface for dealing with the underlying OpenXML API. You could create advanced spreadsheets with charts and formulas, basically, everything (almost everything) that Microsoft Excel offers. Be sure to read the wiki on Github, you can find FAQs and guides about everything you can do with ClosedXML, a great time saver. In the following section, I'll show you a basic example of how you can format the document with colors and styling. Here's what we're going to achieve:
- Format the headers row with a background color, and a bold font
- Format the Id, Serial Number, and Joined On columns to be center-aligned horizontally
- Format the Serial Number column with a background and font color
- Add hyperlinks to the Email values
Here's the updated code for the Excel action method:
public IActionResult Excel()
{
  using var workbook = new XLWorkbook();
  var worksheet = workbook.Worksheets.Add("Users");
  var currentRow = 1;

  worksheet.Row(currentRow).Height = 25.0;
  worksheet.Row(currentRow).Style.Font.Bold = true;
  worksheet.Row(currentRow).Style.Fill.BackgroundColor = XLColor.LightGray;
  worksheet.Row(currentRow).Style.Alignment.Vertical = XLAlignmentVerticalValues.Center;

  worksheet.Cell(currentRow, 1).Value = "Id";
  worksheet.Cell(currentRow, 1).Style.Alignment.Horizontal = XLAlignmentHorizontalValues.Center;

  worksheet.Cell(currentRow, 2).Value = "Username";
  worksheet.Cell(currentRow, 3).Value = "Email";

  worksheet.Cell(currentRow, 4).Value = "Serial Number";
  worksheet.Cell(currentRow, 4).Style.Alignment.Horizontal = XLAlignmentHorizontalValues.Center;

  worksheet.Cell(currentRow, 5).Value = "Joined On";
  worksheet.Cell(currentRow, 5).Style.Alignment.Horizontal = XLAlignmentHorizontalValues.Center;

  foreach (var user in users)
  {
    currentRow++;

    worksheet.Row(currentRow).Height = 20.0;
    worksheet.Row(currentRow).Style.Alignment.Vertical = XLAlignmentVerticalValues.Center;

    worksheet.Cell(currentRow, 1).Value = user.Id;
    worksheet.Cell(currentRow, 1).Style.Alignment.Horizontal = XLAlignmentHorizontalValues.Center;

    worksheet.Cell(currentRow, 2).Value = user.Username;

    worksheet.Cell(currentRow, 3).Value = user.Email;
    worksheet.Cell(currentRow, 3).Hyperlink.ExternalAddress = new Uri($"mailto:{user.Email}");

    worksheet.Cell(currentRow, 4).Value = user.SerialNumber;
    worksheet.Cell(currentRow, 4).Style.Alignment.Horizontal = XLAlignmentHorizontalValues.Center;
    worksheet.Cell(currentRow, 4).Style.Fill.BackgroundColor = XLColor.PersianBlue;
    worksheet.Cell(currentRow, 4).Style.Font.FontColor = XLColor.WhiteSmoke;

    worksheet.Cell(currentRow, 5).Value = user.JoinedOn.ToShortDateString();
    worksheet.Cell(currentRow, 5).DataType = XLDataType.DateTime;
    worksheet.Cell(currentRow, 5).Style.Alignment.Horizontal = XLAlignmentHorizontalValues.Center;

    worksheet.Columns().AdjustToContents();
  }

  using var stream = new MemoryStream();
  workbook.SaveAs(stream);
  var content = stream.ToArray();

  return File(content, "application/vnd.openxmlformats-officedocument.spreadsheetml.sheet", "users.xlsx");
}
The code is self-explanatory, make sure to checkout ClosedXML's documentation though, but let's see what's going on.
Formatting the headers row
worksheet.Row(currentRow).Height = 25.0;
worksheet.Row(currentRow).Style.Font.Bold = true;
worksheet.Row(currentRow).Style.Fill.BackgroundColor = XLColor.LightGray;
worksheet.Row(currentRow).Style.Alignment.Vertical = XLAlignmentVerticalValues.Center;

worksheet.Cell(currentRow, 1).Value = "Id";
worksheet.Cell(currentRow, 1).Style.Alignment.Horizontal = XLAlignmentHorizontalValues.Center;

worksheet.Cell(currentRow, 2).Value = "Username";
worksheet.Cell(currentRow, 3).Value = "Email";

worksheet.Cell(currentRow, 4).Value = "Serial Number";
worksheet.Cell(currentRow, 4).Style.Alignment.Horizontal = XLAlignmentHorizontalValues.Center;

worksheet.Cell(currentRow, 5).Value = "Joined On";
worksheet.Cell(currentRow, 5).Style.Alignment.Horizontal = XLAlignmentHorizontalValues.Center;
The rows (IXLRow) and cells (IXLCell) allow you to change the styling options and configure each instance. Setting vertical/horizontal alignments, changing font properties, etc. is as easy as setting a few properties.
Adding hyperlinks to email addresses
To add a hyperlink to a cell value, you create a Uri instance and assign it to the Hyperlink.ExternalAddress property of the cell.
worksheet.Cell(currentRow, 3).Value = user.Email;
worksheet.Cell(currentRow, 3).Hyperlink.ExternalAddress = new Uri($"mailto:{user.Email}");
Adjusting columns to content
The first example had an issue. The columns weren't adjusted to fit their contents. That's easy to fix with ClosedXML:
worksheet.Columns().AdjustToContents();This line adjusts all columns to fit their contents. The end result looks like the following:
ClosedXML Extensions
ClosedXML has several extension projects, make sure to check them out:
Sample project on Github
You can find the source code for this post on Github. The project was created with Visual Studio 2019 Community Edition running .NET 5. You can run the project using Visual Studio, or the dotnet CLI.
Updated at Wed Mar 24, 2021